Wednesday, May 16, 2018

ESS (Enterprise Scheduler Service) for Inbound JCA Adapters in SOA 12C

Enterprise Scheduler Service (ESS) is a scheduler that is part of SOA Suite 12c. ESS supports a number of scheduling activities around the SOA Suite.
With the help of em console, we can manage job requests, define metadata and schedule jobs, and APIs to define metadata and create schedules in ESS.
In this section, we are going to create a schedule and assign it to a Inbound JCA (jms,file,db polling,etc..) adapter.

Scenario: Deactivate the DB adapter at 10 PM everyday and activate it back at 8 AM next morning. In this case, records created  by system between 10 PM to 8 AM will not be processed immediately.

Expand Scheduling Services, Right click on ESSAPP. Job Requests-> Define Schedules.


Click on Create to create a new schedule.

Now we have to create 2 Schedules, One for activation and other for Deactivation. (Sequence doesn't matter)
Please note that package have to be mentioned as "soa".
First Deactivation,
 Now Activation,


If you want to look at the schedules, you can just click on name of one the schedules.


Now you can go to your composite, And click on adapter.

 Click on calendar icon on the right corner.

Select the schedules created in above steps and click on Apply Schedules.


And you are done!!!!

Note: I have experienced a issue with clustered ESS servers, the schedules created were not displaying in the adapter. So i brought down one of the ESS server and tried the same and it worked. Not sure whether its product bug, so keep this as a workaround if adapters are not showing the schedules created.

Sunday, April 15, 2018

Throttling in OSB 11g - with Work Managers

There are few legacy systems which will not be able to handle too much of load simultaneously. In that cases we need to throttle our system not to send too much requests in parallel.

In OSB, we have 2 different approach to handle this situation.
1. Enable Throttling in Business service.
2. Use custom work manager in Proxy Service.

Throttling in Business Service:

We have an Out-of-box configuration in Business service, where you can just enable the throttling by just check box and configure the values.

But its not available in during the design time, so once the code is deployed to sbconsole. Please follow the below steps to configure the same.

1. Login to Sbconsole.
2. Go to Project Explorer and select the Business service you want to throttle.
3. Select Operational Settings tab.
4. In this tab, under Throttling, select the Enable check box.

  • Maximum Concurrency - Number of parallel request to that service.
  • Throttling Queue - to backlog messages that has exceeded the message concurrency limit
  • Message Expiration - Specify the number of milliseconds that a message can spend in Throttling Queue. The message will be erased after specified time. (It is a optional field) If the message expiration is set to "0" , the message will never expire.


Note: The Queue is a cache memory, so if the server crashes or restarts the messages stored in Throttling queue will be lost.

Throttling Using Proxy service: 

So the Better the option to handle throttling will be work managers along with Proxy Service.
Follow the below steps to create work manager,

1. Login to Console.
2. Select Work Managers.


3. Click on New.
 4. Select Work Manager.
 5. Name the Work Manager and select the targeted server.
 6. Now Click on the Custom Work Manger you have created.
 7. Select "New" on Maximum Thread constraint.
 8. Specify the number of thread you wish to use.
9. Now Activate the session.
 10. Login to Sbconsole and navigate to the Proxy Service.

11. Select the "dispatch-policy" under HTTP Transport Configuration and activate the session.

Note: In this case, the throttling will happen at the proxy service layer itself. So there wont be any message loss.


Friday, April 13, 2018

Create Custom Xpath function in OSB - SOA 11g

In this post, we are going to see how to create Custom Xpath function for OSB 11g. I'm going to take a example of replicating the XREF functions which are available in BPEL,but not in OSB.
The Custom Xref functions are created using a Java Code and deployed into our Server. After restarting the Server, Xref functions will be available in sbconsole. The available Xref Functions will be 
  • populateXrefRow(),
  • deleteXrefRow(),
  • lookupXRef(),
  • lookupXRef1M().
STEPS:
  1.  All the Cross reference values will be stored in XREF_DATA inside SOA_Infra Schema(Or we can change the schema location, Please find the SQL below to create tables in desired schema).  So In Java code we will be connecting to the database(via DataSource) and will retrieve the corresponding values.
  2. Please verify data source “jdbc/SOADataSource” is available and connecting to the schema (which has Xref_data table).
  3. And For Connecting to Database we need a external Jar(ojdbc6.jar and weblogic.jar) to be Imported inside your java Project. It can be imported like, Right click on the Project ->Java Build Path ->Add Jar.
  4. Implement the Java code which will contain the four below functions. (Code attached Below)
  5. Once the code is compiled successfully, we need to export the Java Code as “JAR” file and Copy the Jar File into $OSB_HOME/config/xpath-functions.
  6. Now Create a XML File which will contain the namespace,Class and function name,etc., Like attached (CustomXrefFunctions.xml),
  7. After Placing the XML file in the Same location ($OSB_HOME/config/xpath-functions), Restart the Server. Then Xref functions will be available in the sbconsole.

SQL Statements to create XREF Tables (If you are not planning to use default schemas)

CREATE TABLE XREF_DATA
(
    XREF_TABLE_NAME VARCHAR2(2000) NOT NULL,
    XREF_COLUMN_NAME VARCHAR2(2000) NOT NULL,
    ROW_NUMBER VARCHAR2(48) NOT NULL,
    VALUE VARCHAR2(2000) NOT NULL,
    IS_DELETED VARCHAR2(1) NOT NULL,
    LAST_MODIFIED TIMESTAMP NOT NULL
);
ALTER TABLE XREF_DATA
    ADD CONSTRAINT XREF_DATA_PK PRIMARY KEY (XREF_TABLE_NAME, XREF_COLUMN_NAME, VALUE);

CREATE INDEX XREF_ROW_NUMBER ON XREF_DATA
    (ROW_NUMBER );

CREATE INDEX XREF_VALUE ON XREF_DATA
    (VALUE );

JAVA Code:


Thursday, April 12, 2018

How to Copy Files/Folders from one server to another remote server in Linux

We can use scp command to copy files and folders from one server to another server. Below is the syntax for scp command.

scp [-1246BCpqrv] [-c cipher] [-F ssh_config] [-i identity_file] [-l limit] [-o ssh_option] [-P port] [-S program] [[user@]host1:]file1 ...[[user@]host2:]file2

scp stands for secure cp (copy), which means you can copy files across ssh connection, it uses the port 22 by default.

  • Copy File from Server 1 to Server 2, assuming you already logged in to server 1.
scp /path/of/file username@serverhost:/path/to/destination
example: scp /tmp/sample.txt user1@122.1.1.197:/tmp/sampledirectory/

  • Copy folders from Server 1 to Server 2, assuming you already logged in to server 1.

scp -r /path/of/source-folder user@server:/path/to/destination-folder/
example: scp -r /tmp/somedirectory user1@122.1.1.197:/tmp/sampledirectory/
Note: -r Recursively copy entire directories.

  • Copy specific files under a folder from Server 1 to Server 2, assuming you already logged in to server 1.
scp /path/of/source-folder/*.txt user@server:/path/to/destination-folder/
example: scp /tmp/sample/*.txt user1@127.1.1.197:/home/sample/


How to use wildcard character for namespace in XSLT 1.0

XSLT 1.0

We can't use wildcard characters (*) for namespace directly in XSLT 1.0, but there is a different way of representing wildcard character like below.

ns1:sample/ns1:test/ns1:input is equivalent to ns1:sample/ns1:test/*[local-name() = 'input']

ns1:sample/ns1:test/ns1:input is equivalent to ns1:sample/*[local-name() = 'test']/*[local-name() = 'input']

But XLST 2.0 supports wildcard character as below as it is like ns1:sample/*:test/*:input

Monday, March 19, 2018

How to Update MDS Files using scripts in SOA 12C | AIAConfigurationProperties File

Below are the steps to update AIAConfigurationProperties.xml in SOA 12C. You can pretty much use the same steps to update any MDS files in SOA 12C.

1. Open Putty, Go to below location(location might differ based on your installation) /soa/oracle/oracle_common/common/bin

2. run wlst.sh like below.
./wlst.sh

3. It will be in offline mode, so do
connect()
Once it prompts for username/ password, please provide weblogic credentials, like below
t3://host:port
Example t3://123.12.12.12:7001

4. exportMetadata(application='soa-infra',server='SOAServer1',toLocation='/home/MDSArtifacts',docs='/**')
(This is a one time activity, to get the current structure of  MDS in your server location, You can choose any toLocation in above statement.)

5. Now go to below location to update the AIAConfig file.
(you can open in another session or open the file using Winscp)
/home/MDSArtifacts/soa/configuration/default and Change the AIAConfigurationProperties.xml

As you might be already aware, in SOA 12c AIAConfig file will be under "soa" folder instead "apps".

6. Change update the file as required.

7. importMetadata(application='soa-infra',server='SOAServer1',fromLocation='/home/MDSArtifacts',docs='/soa/configuration/default/AIAConfigurationProperties.xml')

8. Reload the configuration by go to SCE console.
http://host:SOAPort/sce

Example: http://123.12.12.12:8001/sce

How to Decompress the XML from Base 64 format in BPEL | GZIP | SOA

Below is the Java embedding code to decompress the base 64 format into a XML.

try                                                     
{     
//Base 64 Format to Bytes 
oracle.xml.parser.v2.XMLElement inputPayload = (oracle.xml.parser.v2.XMLElement)getVariableData("Invoke_Target_OutputVariable","Result","/response/paylaod");           
String inputstr = inputPayload.getTextContent();
byte[] valueDecoded = org.apache.commons.codec.binary.Base64.decodeBase64(inputstr.getBytes());
//Bytes to GZIP
java.util.zip.GZIPInputStream zis = new java.util.zip.GZIPInputStream((java.io.InputStream) new java.io.ByteArrayInputStream(valueDecoded));
//GZIP to XML
StringBuilder xmlStr = new StringBuilder();
byte[] buffer = new byte[1024];
int read = 0;
while (zis.available()==1) {
while ((read = zis.read(buffer, 0, 1024)) >= 0) {
xmlStr.append(new String(buffer, 0, read));
}
}
String xmlMsg = xmlStr.toString();
//Assign XML to a Variable in BPEL
setVariableData("Temp_EBM", xmlMsg); 
}                                                 
catch(Exception e)                                                 
{                                                 
e.printStackTrace();                                                 
}

To learn how to compress, please use below link.
How to compress xml using gzip in bpel

How to Compress the XML Using GZIP in BPEL | Bas64 | SOA

Below is the Java embedding code in BPEL which will compress the XML using GZIP and convert it into Bas64 format. Compression ratio will be around 85%.

try {               
//Retrieve XML and Convert it to String           
    oracle.xml.parser.v2.XMLElement inputPayload = (oracle.xml.parser.v2.XMLElement)getVariableData("inputVariable","payload","/inputXML"); 
    oracle.xml.parser.v2.XMLDocument xmlPayload = inputPayload.getDocument();             
    java.io.ByteArrayOutputStream outputStream = new java.io.ByteArrayOutputStream();             
    xmlPayload.print(outputStream);             
    String inputstr = outputStream.toString();

//Compress the string using Gzip and Convert it to byte[]     
java.io.ByteArrayOutputStream bos = new java.io.ByteArrayOutputStream(inputstr.length());   
java.util.zip.GZIPOutputStream gzip = new java.util.zip.GZIPOutputStream(bos);         
gzip.write(inputstr.getBytes());         
gzip.close();         
byte[] compressed = bos.toByteArray();         
        bos.toByteArray();         
bos.close();         

//Convert the Gzip to Base64 Format           
  oracle.soa.common.util.Base64Encoder encoder = new oracle.soa.common.util.Base64Encoder();                   
  java.lang.String encodedString = null;                   
  encodedString = encoder.encode(compressed);             
   
//Assign it to Invoke variable           
  setVariableData("Invoke_TargetSystem_InputVariable", "Parameters", "/request/paylaod", encodedString);       
   
} catch (Exception e) {                   
  addAuditTrailEntry(e);                   
}

To learn how to decompress, please use below link.
How to decompress xml from base64|GZIP

Wednesday, March 7, 2018

How to import/export/deploy MDS from EM console - SOA 11g

Export MDS Artifacts from EM console

Open Em console
http://host:port/em

Right Click on Soa-infra and select Administration-> MDS Configuration


And then Click on Export button, to export all the metadata contents to your machine.


Import/Deploy MDS Artifacts 

Right Click on Soa-infra and select Administration-> MDS Configuration

Click on Choose file under import.

Point to be noted is the folder structure. The Root folder should start from apps. 

For example, if you want to import some files under ApplicationConnectorServiceLibrary then you should create the folder structure like apps\AIAMetaData\AIAComponents\ApplicationConnectorServiceLibrary\AIA\ProviderABCS\Sample.wsdl

Then Zip the apps folder and import it here in the EM console.


Thursday, January 18, 2018

How to delete Files and folders from MDS using WLST Commands

There are many times when will deploy unwanted files/folders into MDS and later we need to remove the same.
Below are few WLST commands which will be really helpful in this place.

To use those custom commands, you must invoke the WLST script from the appropriate Oracle home. Do not use the WLST script in the WebLogic Server home.
  • For MDS custom WLST commands, you must invoke the WLST script from the Oracle Common.
  • For other components, such as Oracle HTTP Server, Oracle SOA Suite, or Oracle WebCenter Portal, invoke WLST from the Oracle home in which the component has been installed. 
1. To delete files from MDS

To use these MDS custom WLST commands, you must invoke the WLST script from the Oracle Common. The path will look something like below,
Run Oracle/Middleware/oracle_common/common/bin/wlst.sh

Its a online function so do connect() and execute it.
Enter connect()
Give Username / password / URL (Port number belongs to Admin server)


After login, execute below command to delete the file from MDS,

deleteMetadata(application='soa-infra',server='soa_server1',docs='/apps/Sample/abc.wsdl')


2. To delete Folders from MDS

For components such as Oracle HTTP Server, Oracle SOA Suite, or Oracle WebCenter Portal, invoke WLST from the Oracle home in which the component has been installed. The path will be similar to below,

Run Oracle/Middleware/Oracle_SOA1/common/bin/wlst.sh
It's an Offline function. 

sca_removeSharedData('http://hostname:portno<SOAServerport>', 'AIAMetaData/AIAComponents/ApplicationObjectLibrary/Test','weblogic','weblogicpassword') 
It will remove the folder "Test" from apps/AIAMetaData/AIAComponents/ApplicationObjectLibrary/Test


Note: to delete the folder, the folder should atleast contain one file. If the folder doesn't contain any files, there is a work around to remove dummy folders from MDS. You can delete the folders directly from MDS schema, with the help of below URL.

select * from mds_paths where path_fullname like '%/apps/AIAMetaData/Custom%';
It will delete all the folders(subfolders) under AIAMetadata/Custom
But please be very careful about executing this statement.

References:
http://docs.oracle.com/cd/E28271_01/web.1111/e13813/custom_mds.htm
https://docs.oracle.com/cd/E23943_01/web.1111/e13813/custom_soa.htm#WLSTC2689
https://docs.oracle.com/cd/E23943_01/core.1111/e10105/getstart.htm#ASADM109

Thursday, September 7, 2017

Create Custom Xpath function in BPEL - SOA 11g

Sometimes the functions available in BPEL/XSL will not be sufficient enough to handle our requirements. I came across one such scenario to find out the offset value based on date. So i created a function in java and used it as a custom xpath function in XSL.

You can use the below steps to create a function and bring it to SOA server,

1. Create a Java code.

While creating java code we need to take care of few things,
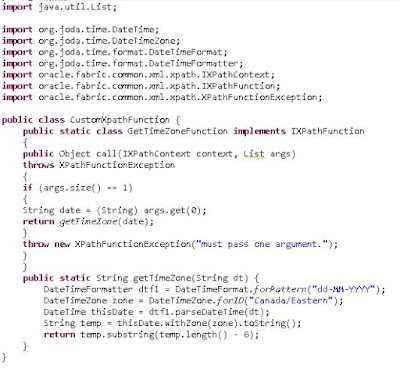
  • A public static method with the same name as the function name. This method is used by the XSL function for invocation. In this example getTimeZone(String dt)
  • A public Class - which will be used in custom xpath xml in next step
  • A public static inner class which implements:
    • oracle.fabric.common.xml.xpath.IXPathFunction
      • In this example, GetTimeZoneFunction - it can be anything relevant
      • We have to import  oracle.soa.fabric jar into our library, mostly it will be in below installed location. jdeveloper\soa\modules\oracle.soa.fabric_11.1.1\oracle.soa.fabric.jar
Below is the screen shot of my implemented function. I have used "joda-time-2.8.1.jar" as external library.


2. After that, we need to add this method to our custom Xpath function list. Go to below location 
Oracle/Middleware/Oracle_SOA1/soa/modules/oracle.soa.ext_11.1.1/classes/META-INF/
And edit the ext-soa-xpath-functions-config.xml

Please add the content at the bottom,
<function name="tim:getTimeZone">
    <className>sample.CustomXpathFunction</className>
    <return type="string"/>
    <params>
      <param name="date" type="string"/>
    </params>
  </function> 
also add the namespace on 1st line of the file,
<!--usually the namespace will be the combination of xmlns:tim="http://www.oracle.com/XSL/Transform/java/Package.ClassName-->
Example:
<soa-xpath-functions xmlns="http://xmlns.oracle.com/soa/config/xpath"              xmlns:aia="http://www.oracle.com/XSL/Transform/java/oracle.apps.aia.core.xpath.AIAFunctions"
 xmlns:tim="http://www.oracle.com/XSL/Transform/java/sample.CustomXpathFunction">

Now you have two options.

1a. Once the Java code is ready, generate the class files and copy(as the same folder structure) it to below location in the server,
Oracle/Middleware/Oracle_SOA1/soa/modules/oracle.soa.ext_11.1.1/classes/

or 

2a. Once the Java code is done, Create a jar file out of it and copy it to below location in your server,
Oracle/Middleware/Oracle_SOA1/soa/modules/oracle.soa.ext_11.1.1/classes/

2b. Now Run the Build.xml using ant script(How to Run ant script) in below location /omr/soa/Oracle/Middleware/Oracle_SOA1/soa/modules/oracle.soa.ext_11.1.1/


2c. Restart the SOA server 


Now you can use the function in any XSL or BPEL by defining the namespace(which we used it in ***-config.xml) in it.


Reference:
http://docs.oracle.com/cd/E23943_01/doc.1111/e17364/customxpath.htm#FPDEV2188


Friday, August 25, 2017

Publish action with Error Handling in OSB 11g

There are several ways that we can invoke target service in OSB.
1. Service callout
2. Routing
3. Publish

We use Publish action when you don't need to wait for the response from target service like JMS queue, producing files or invoking one way services.(kind of fire and forget)
If we use the publish action, even though there is some error in the target service it will not stop the flow. Our flow will just move on to the next activity in the pipeline.

But in some cases we do need to handle the exception in publish, like if the webservice is down.

To catch the error, we need to add Routing Options under publish and make the quality of service to "Exactly once".

Publish with "exactly once" is architecturally equivalent to synchronous service invocation and it will be no longer a "fire and forget" invocation.

Publish action will become Synchronous call in one another case as well, if we are invoking another OSB proxy service (on Local, or on HTTP) the thread will be blocked until we get the response.


Wednesday, August 2, 2017

How to Invoke Async BPEL from Sync BPEL | Is it possible to add wait activity in Sync BPEL.?

Is it possible to invoke a Asynchronous BPEL from Synchronous BPEL.?
Yes. Its possible. 

Is it possible to add "Wait" activity in Sync BPEL.?
Yes. Its possible.

While you are trying to invoke a Async BPEL from Sync BPEL, you might notice that the invoke activity is success. But the receive activity will be in Pending state as show below.


Same for wait activity as well.

And also you might notice an error message in dashboard as below.

"Waiting for response has timed out. The conversation id is null. Please check the process instance for detail. "

To resolve this, you need to change the transaction property(in composite.xml) in Sync BPEL as,

<component name="BPELProcessXX" version="1.1">
<implementation.bpel src="BPELProcessXX.bpel"/>
<property name="bpel.config.transaction">requiresNew</property>
<property name="bpel.config.oneWayDeliveryPolicy" type="xs:string"
              many="false">async.persist</property>
</component>


Monday, June 5, 2017

How to deploy MDS artifacts (WSDL and Schemas) through Jdeveloper


  1. Create a new application (Generic Application)
    2. Name the application as MDSApp (it can be anything) doesnt matter
     3. Create a Project (name it anything)
     4. Right Click on the project, Select "Project Properties".
    5. Navigate to deployment and Click on New
     6. Select the Archive type as "JAR File".
    7. Click on contributors and  select the folder (where your mds artifacts are located). The Folder structure in your local should be same as MDS location. Select the folder "apps". And click on Filters, to select the files you want to deploy.

     8. Click on application(not project), deploy-> New Deployment profile.
     9.Select SOA Bundle.
    10. Name the deployment profile(leave it as default)
     11. Click on dependencies and select the "archive1" (the jar file you have created in step 6) and Click on "Ok".
     12. Now deploy the application (Not the project) into the server.

Friday, June 2, 2017

Cannot find composite composite.xml in sar file

Problem: 

While deploying the Composite from Jdeveloper, you get the below error.

HTTP error code returned [500]
Error message from server:
There was an error deploying the composite on soa_server1: Error occured in processing sar file sca_testProject_rev1.4.jar before transfering into MDS store. Please make sure the sar file is a valid jar file.: Cannot find composite composite.xml in sar file : sca_testProject_rev1.4.jar. Abort deployment..

Check server log for more details.
Error deploying archive sca_testProject_rev1.4.jar to partition "default" on server soa_server1
####  Deployment incomplete.  ####


Reason:

If you open up the .jar file in deploy folder of the composite, you could find nothing in it or just scac.log and scac_out.xml files will be there. Ideally, your .jar file should contain all the files and folders of the composite.
Note: there is no problem with your composite.xml or any of your other files except ".jpr"

Root cause:

The problem is because of .jpr file in your composite, ".jpr" file help us create the jar file while deploying it to server. Normally if you open the .jpr file you could see below tag
 <hash n="oracle.jdeveloper.deploy.dt.DeploymentProfiles"> (Specifically "<hash n="profileDefinitions">" under that) which will describe what files will be part of .jar file.


Somehow your ".jpr" file is corrupted for your composite.

Solution:

To solve this issue-  Create a new composite (just the project skeleton) with exact same name and just copy the ".jpr" to your old composite which was not getting deploying. That should work.

Note: While creating the new project, create the project with same composite name, BPEL name, namespace as well.