How to Invoke REST Adapter in OIC from SOAP Service.?
To Invoke a Rest Adapter from a SOAP Service. First we need to create 2 connections,
1. SOAP Adapter which will be exposed to external system
2. REST Adapter which will be invoked by our Integration.
Please note, the REST service should be already created for this use-case. I have used the REST service which was created in my previous blog.

SOAP Adapter:

Select the concrete WSDL and configure the security as Basic Authentication.

Now we are creating REST Adapter connection.

Please make sure you provide only the Host and Port not the entire Rest URL in Connection URL.
Also provide the security details and test, save it.


Now lets create the Integration, select App Driven Orchestration.


Select the SOAP Adapter created above.

Create the endpoint and leave the others to default.

Now drag and drop Invoke(REST Adapter Connection created above) right above the Map to TestSOAP-Rest.

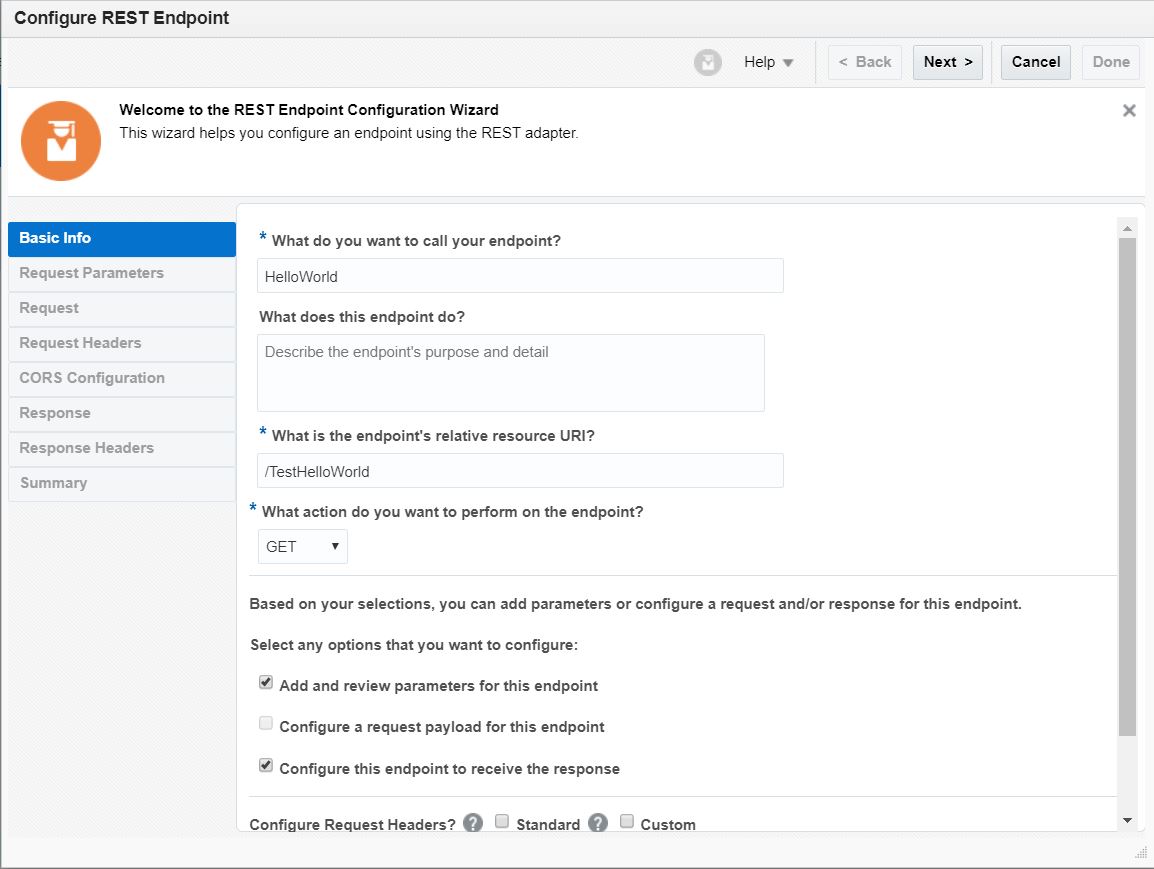
To configure the Rest adapter,
The Endpoint will not have Host-port details, since its already provided in Connections.
So configure it as shown below.
Please note, it doesn't have the Input elements in the URL too.

Define the input required for this Rest adapter .

Select the XML as response by choosing the Schema file.

Now lets map the request to Rest Adapter.


Here we will map the response from REST adapter to response of SOAP service.


Now enable the tracing and activate it.
Create a SOAP UI project to test it.
To Invoke a Rest Adapter from a SOAP Service. First we need to create 2 connections,
1. SOAP Adapter which will be exposed to external system
2. REST Adapter which will be invoked by our Integration.
Please note, the REST service should be already created for this use-case. I have used the REST service which was created in my previous blog.

SOAP Adapter:

Select the concrete WSDL and configure the security as Basic Authentication.

Now we are creating REST Adapter connection.

Please make sure you provide only the Host and Port not the entire Rest URL in Connection URL.
Also provide the security details and test, save it.

Now you can see both the connections in active, ready to use state.

Now lets create the Integration, select App Driven Orchestration.


Select the SOAP Adapter created above.

Create the endpoint and leave the others to default.

Now drag and drop Invoke(REST Adapter Connection created above) right above the Map to TestSOAP-Rest.

To configure the Rest adapter,
The Endpoint will not have Host-port details, since its already provided in Connections.
So configure it as shown below.
Please note, it doesn't have the Input elements in the URL too.

Define the input required for this Rest adapter .

Select the XML as response by choosing the Schema file.

Now lets map the request to Rest Adapter.


Here we will map the response from REST adapter to response of SOAP service.


Now enable the tracing and activate it.
Create a SOAP UI project to test it.