Thursday, April 30, 2020

How to consume message from Kafka in OIC

How to consume message from Kafka Topic in OIC

In this example, I have configured a scheduled orchestrated integration to read records using the Apache Kafka Adapter and publish them to a file location using the FTP write operation.

Drag and drop the kafka adapter into the flow.
Configuring kafka adapter connection is shown in my previous post.


Select Consume records.


Select the topic and partition.
And specify the option for consuming messages as “Read latest”.
Specify Message structure as “Yes”


Select the message structure.

Next and finish.

Below is the map activity between kafka response and FTP input.


Kafka adapter in OIC

Kafka adapter in OIC

How to Create Connection.?

Navigate to Designer->Connections.

 Select the Apache Kafka adapter.


Name the Connection. And please note, role can be only selected as Invoke.


I used localhost:9092* – because the actual connectivity is handled by the agent, so in reality we are connecting to the Kafka server as if we were inside the machine where it runs.
*9092 is the default Kafka port, but you can verify the one you are using in <Kafka_Home>/config/server.properties

Note: Please visit my previous post on how to create Agent and run it in system where kafka is running.


 How to Produce Message into Kafka Topic.?

In this example, I have configured a scheduled orchestrated integration to read records using the FTP Adapter and publish them to an Apache Kafka topic using the Apache Kafka Adapter produce operation.


Final look of the integration will be something like below,


I have not mentioned the steps about reading the message using FTP adapter. Assume your FTP adapter will read the CSV file and we are going to use the same data for publishing into Kafka queue.
Now drag and drop the Kafka connection created in previous step.

You can visit my previous post to understand how to configure FTP adapters.


 Select the publish option.

Select the Topic name and partition. If we do not select a specific partition and use the Default selection, Kafka considers all available partitions and decides which one to use.
And select the Specify the Message structure as “Yes”.

You can specify the message structure with one of the below,
1. XML Schema (XSD) document
2. Sample XML document
3. Sample JSON document


Just have a simple Schema with 3 fields.


Select next and finish.
Below is the mapping details from File response to kafka request.


Now Activate the integration and test it. You can see the message in kafka Queue.


In my next post, we can see how to consume message from kafka topic.

How to Create Agent in OIC

How to Create Agent in OIC

When you install the connectivity agent in your environment, you associate the connectivity agent with the agent group identifier. Only one connectivity agent can be associated with an agent group. For a single Oracle Integration instance, you can create up to five agent groups. Creating the agent group also creates the necessary artifacts required for message exchange.

To create an agent group:
  1. In the navigation pane, click Integrations, then click Agents.
  2. Click Create Agent Group.
  3. Enter the following information, then click Create
Note: Just keep note of the Identifier.


Now download the Connectivity Agent jar from console.


Unzip the file and edit InstallerProfile.cfg in it.


Enter OIC environment details and agent Identifier.
Note: you have to add oic_USER/oic_PASSWORD, it will not be there by default since it’s an optional parameter.
You must place the file in Linux server using winscp/filezilla.


Now navigate to the folder location in putty and run below command to run the connectivity agent. I have used nohup & to run this in in background.

nohup java -jar connectivityagent.jar &


Once you see the above message, you can confirm agent its running successfully. You can also check the agent status in OIC, Navigate to Monitoring, Agents and look for the status.


Wednesday, January 29, 2020

How to List, Read, ZIP, Write Files in OIC

How to List, Read, ZIP, Write Files in OIC

In this example, we are going to see how to use the FTP adapters to List, Read, ZIP and write files.
Below is the Overview of our exercise,
  • Create a Connection
  • Create Integration
    • List Files (Using FTP Adapter)
    • For Each File Present in that Location,
      • Download the File (Using FTP Adapter)
      • ZIP the File (Using Stage Activity)
      • Write the File (Using FTP Adapter)

Create Connection

Please check my earlier post for step by step instruction on creating connection for FTP Adapter.

Create Integration

Create a App Driven Orchestration.


Create the SOAP Adapter as a start.


Drag and drop the FTP Connection from Invokes.


We are going to use this FTP adapter for listing the files present in remote location. Name it as ListFiles and click next


Select Operation as ListFiles
Provide Input directory and File Name pattern. You can override this in run-time using map activity.
Click Next and Done.


Now we are going to read each file and ZIP it and produce it to a new FTP Location.
Drag and Drop ForEach activity from Actions tab.

 Edit the For Each Activity.

Provide name and repeating element details. And decide the current element name(it can be anything but provide a relevant name)

Drag and Drop the FTP adapter once more, this time we are going to download the file to local for us to ZIP the File.


Provide the Input directory of remote FTP Location, and Download Directory of something unique.
OIC will create the Folder in run-time locally and download the file to this location.
*File Name will be overridden in run-time using map activity.

 Edit the Map Activity to provide the Directory and File Name to be downloaded. it will be fetched from Current element name which was given in For-Each.
Note: Also you can see i have overridden the Download Directory as well. Since there will be more files in remote location i want each file to be download to new location. If you want all the files to be downloaded to the same folder, don't assign anything here.


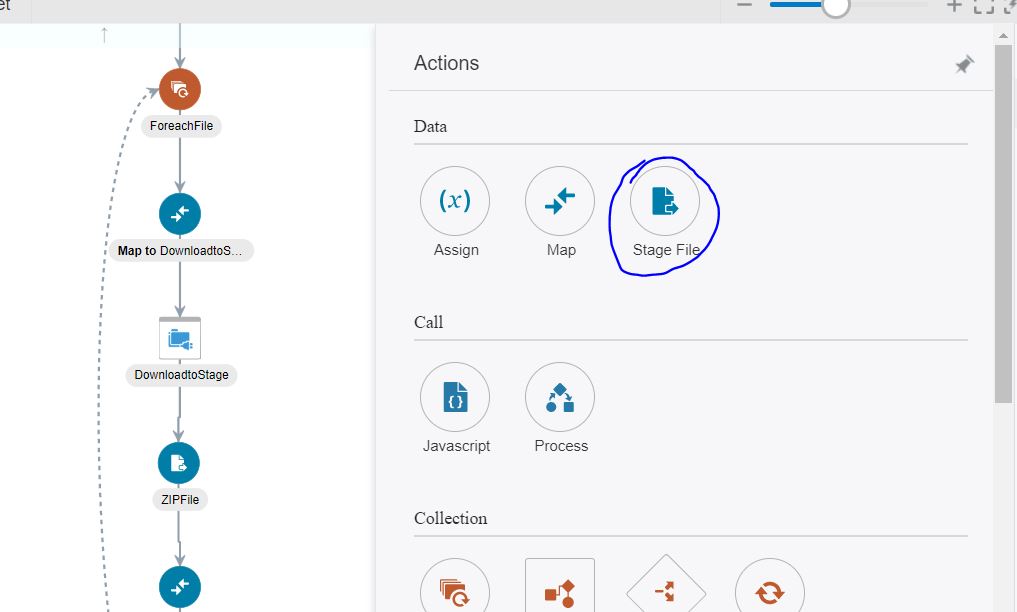
Now you have the files downloaded to OIC, you can ZIP that directory using Stage File Activity.


Specify the File Name : Target file name (.zip file)
Specify the Directory to ZIP : Provide the Directory name where the File was downloaded(previous step)
Specify the Output Directory: Mention unique Directory name (its local to OIC)


Now we have Downloaded and Zipped the file in a OIC location. We have to use FTP adapter again to write this file to remote server. So drag and drop FTP Adapter and Configure it.


Now Click on the Edit Map to Override the Filename and File.


And You are Done.!!! 
Create a SOAP UI Project to trigger the Integration.

FTP Adapter in OIC

How to Read from FTP Adapter in OIC.

To Integrate with FTP location in OIC,
1. Create an Connection with FTP Adapter.
2. Create an Integration to use the connection we created in First step.

In this example, we are going to see how to read data from File using an FTP adapter.

Create Connection

Create the Connection for FTP Adapter.


Populate Host,Port and SFTP as Yes if you are using port as 22.
Populate the Username and Password in Configure security.

Create Integration


Here i have selected the connection of soap adapter which i created in earlier exercise. Please click here to explore more.

Now drag and drop the FTP Connection(created in first step) from Invokes window into the integration flow.


Provide a name.

 Select the operation as "Read File". Provide a dummy file name, because we will override the filename in run-time.

Please select "Yes" for specify structure if you want to read the content of the file.

Provide a sample file here, it will automatically generate the schema in background.
Enter the relevant record name and root element name(Recordest Name)

Edit Map to Read File to set the filename. In this case, we will receive the filename as input from soap service and pass it in run-time.
Note: You can override directory as well, here i haven't done that.


Edit response mapping to pass the result of file content to the SOAP service.


Now save and activate the integration.
Create a Soap Ui project to test the integration. Pass the file name as input and receive the output of file content.