Thursday, August 6, 2020

CASDK-0004: Failed to authenticate against the application with the credentials provided; LOGIN_MUST_USE_SECURITY_TOKEN: Invalid username, password, security token; or user locked out.

While creating a connection in OIC to Salesforce for the first time, we might probably receive this below error.

CASDK-0004: Failed to authenticate against the application with the credentials provided; LOGIN_MUST_USE_SECURITY_TOKEN: Invalid username, password, security token; or user locked out. Are you at a new location? When accessing Salesforce--either via a desktop client or the API--from outside of your company’s trusted networks, you must add a security token to your password to log in. To get your new security token, log in to Salesforce. From your personal settings, enter Reset My Security Token in the Quick Find box, then select Reset My Security Token.

If you are wondering how to get the Security Token from SFDC, Please follow the below steps.

Login to Salesforce.

Click on Settings below your Name.

Click on Reset Security Token button, which will send an email with the security token.

Once you have the Security token, come back to Configuring connections in OIC.

Enter the password as below,
<YourPassoword> + <Security Token>

For example, if your password is "test123" and token is "mxvri28rnmashe2!ddfr". Then enter the password as below, 
test123mxvri28rnmashe2!ddfr

Now you can successfully Test the connection.

Monday, July 6, 2020

Authentication Exception While Invoking Soap Integrations In OIC

Problem:

While invoking the SOAP Integration in OIC, receiving below error

Error message is - javax.xml.ws.WebServiceException: Error while dispatching SOAP message to the endpoint https://*******/ic/ws/integration/v1/flows/soap/SAMPLETEST/1.0/:javax.xml.soap.SOAPException: javax.xml.soap.SOAPException: Message send failed: Missing WWW-Authenticate header.
===== reqeust ========
Content-Type:text/xml; charset=UTF-8
Content-Length:4130
SOAPAction:"process"
X-Oracle-OIC-Flow:1

<env:Envelope xmlns:env="http://schemas.xmlsoap.org/soap/envelope/">
<env:Header>
<instra:ReferenceParameters env:mustUnderstand="0" xmlns:instra="http://xmlns.oracle.com/sca/tracking/1.0">
<instra:tracking.integrationSuite.parent.ctx>1.5057432e-51c7-41f3-968b-1a35f0df2a17-00019995;vPs2CEo0CCp7DE</instra:tracking.integrationSuite.parent.ctx>
</instra:ReferenceParameters>
</env:Header>
<env:Body>
<client:process xmlns:ns0="http://www.oracle.com/XSL/Transform/java/oracle.tip.dvm.LookupValue" xmlns:plnk="http://schemas.xmlsoap.org/ws/2003/05/partner-link/" xmlns:ns3="http://www.oracle.com/XSL/Transform/java/com.bea.wli.sb.resources.icsxpathfun:Application Error

Solution:

By default SOAP connection would have Username Password Token Authentication, Change it to Basic Authentication.


Wednesday, May 20, 2020

How to Encrypt / Decrypt Files in OIC using PGP

How to Encrypt / Decrypt Files in OIC using PGP

Oracle Integration Cloud provides Pretty Good Privacy (PGP) mechanism to encrypt or decrypt the files which allow us to read/write files in a secure manner.

We need PGP public and private keys to achieve this,

  • PGP public key is used to encrypt the file
  • PGP private key is used to decrypt the file
I have used the below online tool to generate the PGP keys.

A public key is published and enables any sender to perform encryption and the private key is kept secret by the receiver and enables only him to perform correct decryption.

In below example, we would assume sender and receiver both are us(OIC).

How to Encrypt the File

Create FTP Connection with below details,


Choose one of the following security policies,
  • FTP Server Access Policy—This policy uses the user name and password for authentication.
  • FTP Public Key Authentication—This policy connects to the sFTP server using a key. This is used only for sFTP connections. 
  • FTP Multi Level Authentication—This policy uses multiple independent credentials to log in to the server. 

I have selected FTP Public Key Authentication. The simpler one is "FTP Server Access Policy" which just allows you to connect with plain username/password.

ASCII-Armor Encryption Format:

Select to format the encrypted message in ASCII armor. ASCII armor is a binary-to-textual encoding converter. ASCII armor formats encrypted messaging in ASCII. This enables messages to be sent in a standard messaging format. This selection impacts the visibility of message content. If not selected, the message is sent in binary format.

I have selected as "Yes", it depends on your requirement.

Cipher Algorithm : 

Select the symmetric cryptographic algorithm to use. Symmetric-key algorithms for cryptography use the same cryptographic keys for both encryption of plain text and decryption of cipher text.

  • CAST5
  • 3DES
  • AES128
  • AES192
  • AES256


Now let's create the integration and drag/drag the FTP connection created above.


Make sure to select "Perform PGP Encryption on the file to be sent to external FTP Server".


How to Decrypt the File

To Decrypt the file, you would need to use the private key. I will use the same FTP Connection created above, update the private key and its password(if applicable).


And Create a new integration to download the file and decrypt.


Select operation as "Download file".
And Make sure to select "Perform PGP Decryption on an encrypted file downloaded from external FTP Server".


Thursday, May 7, 2020

Data Stitch and Global Variables in OIC

Data Stitch and Global Variables in OIC

In this post, we will look at 2 new Integration features Data Stitch and Global Variables.  Data Stitch allows us to make assignments to complex type variables. Below is the use case,
  • Accept multiple country codes as input.
  • For loop
    • Retrieve the country details from an REST API.
    • Use Data Stitch to collate the response (in a temporary variable)
  • Assign the Response from temporary variable.
I'm going to use a REST API which is available online for creating a connection.
https://restcountries.eu/rest/v2/alpha/{code}

Prerequisite:
Enable following features:
  • oic.ics.console.integration.stitch-action
  • oic.ics.console.integration.complex-variables

The minimum Oracle Integration version required for the feature is 200113.1400.33493
Global Variables are visible anywhere in the integration, including fault handlers.

Creating REST Connection


Creating a SOAP Connection

 I have used a schema which will look like below for the above soap connection.
Create your own wsdl with below elements in request and response.

 Creating the App Driven Integration


Drag and Drop the SOAP Connection Created and configure the details.


Now drag and Drop the REST Connection to configure the details.
Please make sure to select the highlighted checkbox


You have to select JSON Sample and click on inline to enter the sample response.
You can take the RESPONSE EXAMPLE from this site. https://restcountries.eu/


 Now drag and drop the For Each activity right after the first task.


I have changed the Layout to Horizontal.
Reposition the Map and Rest Invoke inside the For each.
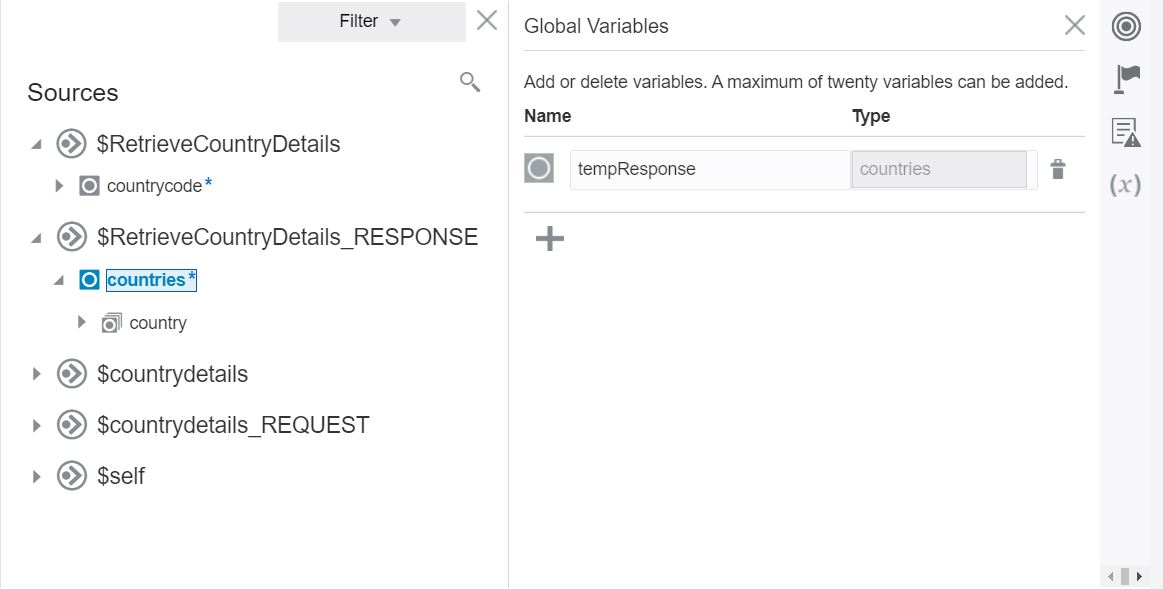
 Now lets create a Global variable,


Name the Variable as tempResponse and Type as "Object".
Select the response of this SOAP interface. This variable will be used along with data stitch.


Now lets map the request for REST API as below.


Drag and drop a new Map activity after the REST Invocation.
The response mapping will be something like below.
Note: The variable you see in the target is the actual response element of this interface, not the temp variable we created.


Now drag and drop the Data Stitch activity, right after the mapping(inside the for each).
Name the activity and click configure.

Now we have to copy/append the data from CountryDetails_Response (which was mapped in previous activity) into tempResponse variable.

You can use Data Stitch to Overwrite the values as well, it has 3 options

  1. Append (shown in this example)
  2. Assign (Overwrite values in a complex element)
  3. Remove (Delete an element from a complex element)


And in the Map activity after ForEach, we will take the data from tempResponse and map it to response element of this interface.

Now activate the interface and test it from SOAP Ui.


Monday, May 4, 2020

Iaas Vs Paas Vs Saas

Iaas Vs Paas Vs Saas

IaaS (Infrastructure as a Service):

Infrastructure as a service (IaaS) is an instant computing infrastructure, provisioned and managed over the internet. You get the InfraStructure & Pay accordingly. You have freedom to install any OS or Applications as required.

Example : Amazon Web Services (AWS), Google Cloud Platform (GCP), Oracle Cloud Infrastructure (OCI). Below are the few variations on Iaas,

  • Compute Cloud Services (Virtual Machines, EC2)
  • Network Cloud Services (DNS,Load Balancing)
  • Storage Cloud Services (File Storage)


PaaS (Platform as a Service):

PaaS or platform as a service model provides you computing platforms which typically includes an operating system, programming language execution environment, database, web server. Technically It is a layer on top of IaaS as the second thing you demand after Infrastructure.

PaaS delivers the infrastructure and middleware components that enable developers, IT administrators and end users to build, integrate, migrate, deploy, secure, and manage mobile and web applications.

Example : Google App Engine, SOA Cloud Service, Oracle Integration Cloud Service

SaaS (Software as a Service):

In a SaaS, you are provided access to application services installed at a server. You don’t have to worry about installation, maintenance or coding of that software. You can access and operate the software with just your browser. You don’t have to download or install any kind of setup or OS, the software is just available for you to access and operate. The software maintenance or setup or help will be provided by SaaS provider company and you will only have to pay for your usage.

Example: Oracle HCM Cloud, Oracle ERP, Microsoft office365, Salesforce.

Thursday, April 30, 2020

How to consume message from Kafka in OIC

How to consume message from Kafka Topic in OIC

In this example, I have configured a scheduled orchestrated integration to read records using the Apache Kafka Adapter and publish them to a file location using the FTP write operation.

Drag and drop the kafka adapter into the flow.
Configuring kafka adapter connection is shown in my previous post.


Select Consume records.


Select the topic and partition.
And specify the option for consuming messages as “Read latest”.
Specify Message structure as “Yes”


Select the message structure.

Next and finish.

Below is the map activity between kafka response and FTP input.


Kafka adapter in OIC

Kafka adapter in OIC

How to Create Connection.?

Navigate to Designer->Connections.

 Select the Apache Kafka adapter.


Name the Connection. And please note, role can be only selected as Invoke.


I used localhost:9092* – because the actual connectivity is handled by the agent, so in reality we are connecting to the Kafka server as if we were inside the machine where it runs.
*9092 is the default Kafka port, but you can verify the one you are using in <Kafka_Home>/config/server.properties

Note: Please visit my previous post on how to create Agent and run it in system where kafka is running.


 How to Produce Message into Kafka Topic.?

In this example, I have configured a scheduled orchestrated integration to read records using the FTP Adapter and publish them to an Apache Kafka topic using the Apache Kafka Adapter produce operation.


Final look of the integration will be something like below,


I have not mentioned the steps about reading the message using FTP adapter. Assume your FTP adapter will read the CSV file and we are going to use the same data for publishing into Kafka queue.
Now drag and drop the Kafka connection created in previous step.

You can visit my previous post to understand how to configure FTP adapters.


 Select the publish option.

Select the Topic name and partition. If we do not select a specific partition and use the Default selection, Kafka considers all available partitions and decides which one to use.
And select the Specify the Message structure as “Yes”.

You can specify the message structure with one of the below,
1. XML Schema (XSD) document
2. Sample XML document
3. Sample JSON document


Just have a simple Schema with 3 fields.


Select next and finish.
Below is the mapping details from File response to kafka request.


Now Activate the integration and test it. You can see the message in kafka Queue.


In my next post, we can see how to consume message from kafka topic.